Working with Trace Files
This section explains how to load, save, and close trace files, and how
to export formatted trace data to delimited text files. It describes
how records are read from file and written to file, and discusses how jobs
are used to accomplish this work.
Opening a Trace File
A trace file must be formatted according to one of the Trace Analyzer's
supported
file formats in order to be loaded into the program. A trace
file is loaded into the Trace Analyzer in one of two ways:
-
At program startup, using the -tracefile
command line parameter. If this option is not used, the File Open
dialog window will be displayed automatically, immediately after the program
has initialized.
-
After program startup, using the
 File - Open action from the Global
Toolbar or Main Menu.
This action displays the File Open dialog window.
File - Open action from the Global
Toolbar or Main Menu.
This action displays the File Open dialog window.

Figure 1. The File Open dialog window
File Open Dialog. A trace file is selected for loading
using the File Open dialog window depicted in Figure
1, either by selecting a file from the list or typing the file's name
in the space provided. The list may be filtered using the Files
of type combo box control.
Indexing Records. Regardless of which method is used to
initiate the loading process, a trace file must first be indexed
before it can be analyzed. Indexing is a process by which the program
scans through the trace file, locating and remembering the position of
each trace record for faster access later. Indexing is implemented
as a job which must run to completion before any
further access to the file is permitted. Thus, there may be a slight
delay, particularly for files containing many records, before the Report
Page is populated with records, and before any information appears
in the Summary Page. The job progress
monitor in the Global Toolbar
provides an indication of the progress of an indexing job.
Accessing Record Data. It is important to realize that,
except for very small traces, a file is not loaded into memory all at once.
Instead, the Trace Analyzer loads records on demand for the purposes of
viewing, filtering, printing, etc. This method of reading records
on demand is known as random file access. While this method
has the benefit of using less memory than if the file were loaded all at
once up front, it also requires that the trace file not be moved, changed,
or otherwise tampered with by external programs while it is being read
by the Trace Analyzer.
Tip: Because records
may be randomly accessed from the trace file at any time during analysis,
it is a good idea to load traces only from the local disk. Although
the program will allow you to load a file from a network attached drive,
you are strongly advised not to do so, as accessing records in a file over
a network connection may have a severe, negative impact on
performance.
Closing a Trace File
A trace file is closed in one of three ways:
-
Explicitly by the user with the
 File - Close action from the Global
Toolbar or Main Menu.
File - Close action from the Global
Toolbar or Main Menu.
-
Automatically, when a new file is opened.
-
Automatically, when the Trace Analyzer program is closed.
The user may be asked to provide a confirmation for a trace file close
request under the following conditions:
-
A data filter currently is applied to the trace data which currently is
loaded. The assumption here is that the user may wish to save or
export the filtered data before closing the file. In this case, a
simple dialog, prompting a confirmation, is displayed.
-
One or more jobs are running and/or are queued, which depend upon the trace
data currently loaded. In this case, the request to close the file
poses a conflict for the job processing engine, since closing the file
would preempt the running/queued jobs. The user is prompted to resolve
this conflict via the Job Conflict dialog
window.
Saving Trace Data
The currently loaded trace can be written to a file of the user's choice.
This feature is accessed with the  File - Save As action from the Global
Toolbar or Main Menu,
which displays the dialog window depicted in Figure
2.
File - Save As action from the Global
Toolbar or Main Menu,
which displays the dialog window depicted in Figure
2.
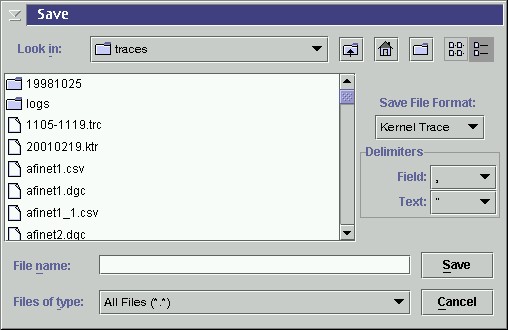
Figure 2. The File Save dialog window
A file name can be chosen from the list or typed into the File name
field. The format in which the file is to be saved is selected from
the Save File Format combo box control. The possible formats
are:
-
the native format of the currently loaded file; or
-
delimited text.
Only the subset of records which is included in the current Overview
Report is written to file, taking into account data filtering and/or
the bookmark-only view setting.
Saving in Native File Format
When the new file is
written in the same format as the currently loaded file, each record is
saved to the new file in its entirety, regardless of what data elements
are displayed in the report template for that record. When the save
is complete, the newly written file immediately is loaded into the Trace
Analyzer as the current file. Therefore, it is important that the
file name selected for the new file follow the naming conventions of the
file format. Otherwise, the file may be rejected as invalid by the
Trace Analyzer I/O Plug-in for that file format.
Exporting as Delimited Text
If the new file is written
as delimited text, only the data elements displayed in the current Overview
Report template are written to file. The text of each element matches
exactly the format displayed in the Overview Report. Thus, if a column
in the Overview Report is displayed in raw
data mode, for instance, the data for that column is written to file
in raw data mode as well. A file saved in this format is not loaded
into the Trace Analyzer after it is written.
When writing the file as delimited text, it is necessary to select the
delimiter characters to be used. Delimiter characters are
used by other programs into which this data might be imported, such as
a spreadsheet. The delimiter characters allow these programs to identify
where each field begins and ends, and to differentiate between text fields
and numeric fields. The delimiter characters are selected from the
combo box components within the Delimiters panel:
-
Field
-
This combo box is used to select the character which will be used to separate
the individual data fields from one another. The boundaries identified
by the field delimiter correspond to the column boundaries in the Overview
Report. The possible field delimiter choices are:
-
comma (,)
-
semi-colon (;)
-
tab
-
Text
-
This combo box is used to select the character which will be used to enclose
fields which represent text (as opposed to those which represent numeric
values). This is necessary in case the field delimiter character
happens to be embedded in a text data field. By surrounding each
text element in a pair of known delimiter characters, an importing program
will not, for instance, misinterpret a comma which is embedded in a data
field for a delimiter which is meant to separate fields. If the chosen
text delimiter happens to be embedded within a text data field, each occurrence
is doubled before the field is written to file. For example, if the
text delimiter was a single quotation mark ('), the data field,
some 'text' data would be exported as:
'some ''text'' data'.
The possible text delimiter choices are:
-
double quotation mark (")
-
single quotation mark (')
Completing the Save
Clicking the Save button launches a job to write
the file to disk. If the selected file name represents an existing file,
the user is first asked for confirmation to overwrite the existing file.
Clicking the Cancel button cancels the save request and dismisses the file
dialog window.
Copyright © 2000-2001 Golden Code Development Corporation.
ALL RIGHTS RESERVED.