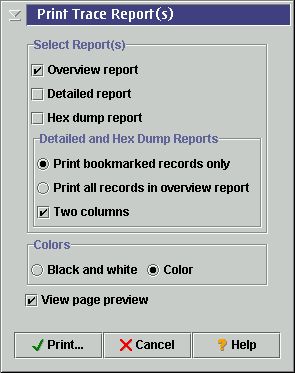
This dialog is used to select the reports to be printed and their content, as well as some formatting options. The various components of the window have the following meanings.
Select Report(s). This group of controls manage the content to be printed.
Overview report. Select this checkbox to print the current contents of the Overview Report.Colors. These controls determine the colors used in both the print preview and the final print output.Detailed report. Select this checkbox if a printout of the Detailed Interpretation Report is desired. The set of records for which this report is printed is determined by the settings within the Detailed and Hex Dump Reports group box.
Hex dump report. Select this checkbox if a printout of the Hex Dump Report is desired. The set of records for which this report is printed is determined by the settings within the Detailed and Hex Dump Reports group box.
Detailed and Hex Dump Reports. This group of controls applies only to the print output for Detailed Interpretation Reports and/or Hex Dump Reports. These controls determine which records are to be printed and the number of columns printed on each page. The settings of these controls are taken into consideration only if either or both of the Detailed report checkbox or the Hex dump report checkbox have been selected.
Print bookmarked records only. Select this radio button if only the records which currently are bookmarked in the Overview Report should be printed. If no records are bookmarked, this represents an invalid choice.Print all records in overview report. Select this radio button if all the records in the Overview Report should be printed. Warning: use this setting with caution; each record will be printed on at least one page, which may result in a very large print job.
Two columns. Select this checkbox to divide the printed page into two columns of equal width. If unselected, only one column will be used, which may be more appropriate for wider content. When printing report content whose width will fit in half a page or less, the two column setting is useful to conserve paper, since each record will be printed on a new page.
When both the Detailed Interpretation and Hex Dump reports are printed in the same job, and two column printing is selected, both reports will be printed on the same page in separate columns, where possible. The Detailed Interpretation Report content will always be printed first, followed by the Hex Dump Report.
Black and white. Select this radio button if print output should be limited to the capabilites of black and white printers.View page preview. Select this checkbox to enable the display of the Print Preview dialog, which allows further customization of the current print job and presents a preview of the printed pages.Color. This radio button should be selected if output should be in color. The colors used in the print output will match, as closely as possible, those colors used in the reports as they appear in the user interface. Note that the final print output will only be in color if color printing is supported by the hardware device used, even though the print preview will depict the print output in color.
Print. Click this pushbutton to accept the above selections and continue with printing. If the View page preview checkbox is selected, the Print Preview dialog will be displayed next. If not, the printer selection dialog native to the underlying operating system will be displayed, so that a printer can be selected.
Cancel. Click this pushbutton to cancel printing.
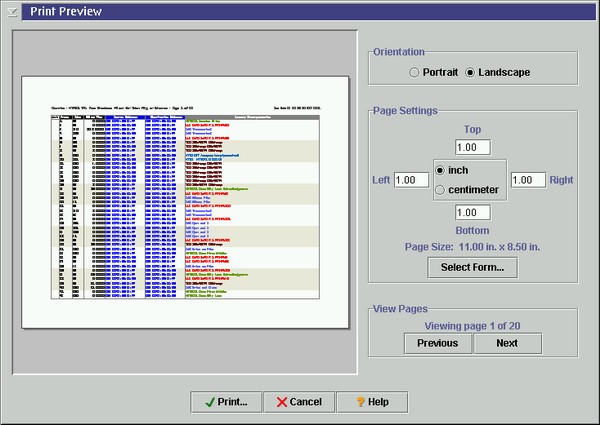
The Page View. On the left side of the Print Preview dialog window is a page view, which displays a scaled version of the content which will be printed. This preview displays a single page of the print job at a time, and uses the actual data which will be printed. The preview is nearly WYSIWYG (What You See Is What You Get). However, since the resolution of the screen generally is not nearly as high as that of the printed page, the fonts depicted in the preview may not scale exactly the same way they will on the final printed output. Thus, the width of some text entries in the preview may not be depicted completely accurately as compared to the final printed output.
Formatting and Navigation Controls. In addition to the page view itself, the Print Preview dialog window contains the following controls to manage the page view and the formatting of the printed page..
Orientation. This group of controls sets the orientation of the printed page.Portrait. Select this radio button to set the page orientation to portrait. The page view is updated immediately, and the total page count for the print job is recalculated.Page Settings. This group of controls sets the page margins and selects the page form. Changing the format using these controls causes the page view to be updated immediately, and causes the total page count for the print job to be recalculated.Landscape. Select this radio button to set the page orientation to landscape. The page view is updated immediately, and the total page count for the print job is recalculated.
Top. Set the top margin of the page in this text field.View Pages. This pair of buttons navigates through the pages of the preview.Left. Set the left margin of the page in this text field.
Right. Set the left margin of the page in this text field.
Bottom. Set the left margin of the page in this text field.
inch. Select this radio button to set the unit of measurement for the page to inches.
centimeter. Select this radio button to set the unit of measurement for the page to centimeters.
Select Form. Click this pushbutton to view a dialog window native to the underlying operating system. This dialog displays a list of paper forms from which to select the form which corresponds to the print media in use.
Previous. Click this pushbutton to view the previous page of the preview.Print. Click this pushbutton to dismiss the Print Preview dialog window and to display the printer selection dialog native to the underlying operating system, so that a printer can be selected to perform the print job.Next. Click this pushbutton to view the next page of the preview.
Cancel. Click this pushbutton to dismiss the Print Preview dialog window without printing.
To complete the print job, select a printer from this final dialog, adjust whatever printer-specific settings require changes, and initiate printing as required by this dialog. Important Note: since the settings within native dialog windows are not available to Java applications, such as the Trace Analyzer, any changes to printer-specific settings will not be remembered between print jobs. Therefore, these settings must be updated every time a new print job is launched.